Fairy Tale Lantern Scene — Little Red Riding Hood
Fairy Tale Lantern Scene — Little Red Riding Hood
A fairy tale scene succeeds or fails on one thing: whether visitors can read the story from the arrangement alone. Little Red Riding Hood is an unusually good subject for this, because everyone already knows the plot — so the…
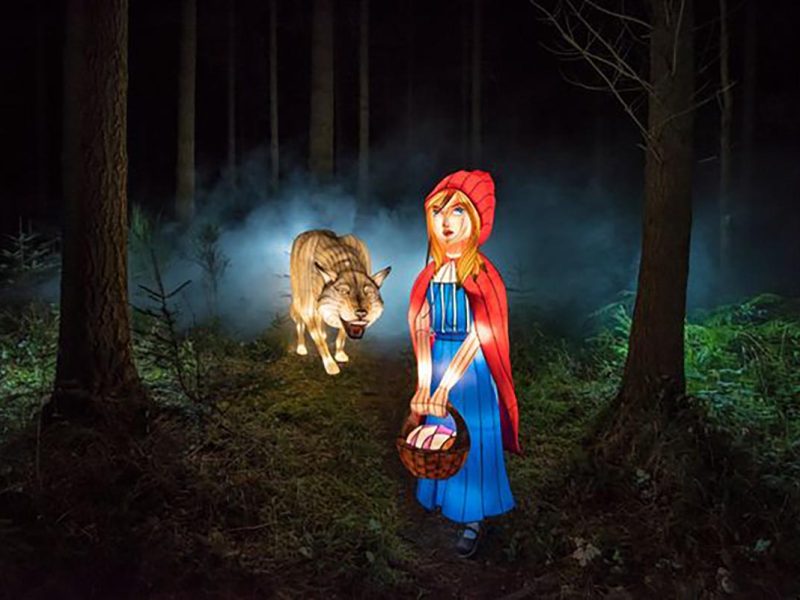
A fairy tale scene succeeds or fails on one thing: whether visitors can read the story from the arrangement alone. Little Red Riding Hood is an unusually good subject for this, because everyone already knows the plot — so the design does not have to explain anything. It only has to place two figures at the right distance from each other and let the space between them do the work. That is what this scene is built around: a girl in a red cloak in the foreground, and a wolf emerging from haze further back, with the gap between them carrying all the tension.
The figures are built on internal frames with hand-painted covering and hand-painted detail, lit internally on a low-voltage LED system suitable for 110 V or 220 V supply, with warm figure lighting and cool atmospheric backlighting behind. The scene runs from roughly 1.5 m to 3 m per figure and includes a forest backdrop of tree trunks and undergrowth, with optional mist integration.

The Story Is in the Distance Between the Two Figures
The most common mistake with a two-character scene is placing the figures side by side so both can be seen clearly. That arrangement destroys the story.
- Distance creates tension. The wolf should be far enough behind that a visitor cannot see both figures in the same glance — the eye should travel, and that travel is the narrative.
- Stagger the depth, not the width. Spreading the figures left and right reads as two exhibits. Setting one behind the other reads as a moment in a story.
- Eye lines must not meet. In this build the girl looks forward, along her route, and the wolf looks at her. That mismatch is what makes the scene feel like a moment before something happens.
- Leave the middle walkable. The space between the figures is where visitors stand to photograph the scene. If planting or props fill that gap, the composition closes up and the tension disappears.
There is a practical bonus to the depth arrangement: a scene laid out front-to-back occupies less width than one laid out side to side, which matters at narrow trail sections and gateways.
Theatrical Lighting — Warm Foreground, Cold Background
The lighting follows stage practice rather than display practice, and the split between the two temperatures is what produces the mood.
| Layer | Light treatment | Effect |
|---|---|---|
| Figures (foreground) | Warm white internal lighting | Reads as lit, safe and close — the characters stay inviting |
| Woodland (background) | Cool blue backlighting | Pushes the forest back and makes it feel deeper than it is |
| Ground plane | Low warm wash | Stops feet from disappearing into black and lifts the whole scene |
Two rules matter here. First, never light the wolf’s face brightly — a clearly lit predator reads as a mascot rather than a threat. Second, keep the background cooler than the foreground by a clear margin; if the two temperatures converge, the depth collapses and the scene flattens into a single plane.
The split also solves a technical problem: cool backlighting on the woodland lets the trees be visible as shapes without competing with the figures for attention, which is why the forest can be dense without becoming visual noise.
Mist, Haze and What They Actually Do
Haze is optional, but on this scene it earns its place because it affects the story rather than only the atmosphere.
- It separates the wolf from the background. Haze behind the wolf creates a soft edge, which makes the animal feel partially hidden — exactly the reading the story needs.
- It hides the base. Both figures stand on something. Haze at ground level softens the transition and lets the figures appear to stand in a clearing.
- It amplifies the lighting split. Cool backlight through haze produces a visible glow that warm front light cannot create.
- It requires access and power at the base. Effects equipment needs a supply point, refilling access and a decision about indoor use — many covered venues restrict haze, so this is settled before fabrication.
The Forest Setting and Its Three Jobs
The woodland backdrop is not scenery for its own sake. It performs three functions at once: it gives the scene a boundary so visitors do not see through it from behind, it provides the vertical elements that make the figures look grounded, and it blocks the view of what is behind the installation on an open site.
- Trunks should be irregular. Evenly spaced trunks read as a fence. Variation in spacing, diameter and angle reads as woodland.
- Undergrowth hides the fixings. Low planting around the bases conceals both the base structures and the cable runs.
- Leave the path sightline clear. The backdrop should sit behind the figures relative to the approach, not across it.
The aim is a scene that looks like it was found in the woods rather than installed on a lawn. That is mostly a question of irregularity and of keeping the structure out of sight.
Scale, Sightlines and Child Height
Because the audience for this scene is largely families with young children, the scale decisions follow the children rather than the space.
- 1.5–2 m for the girl allows a child to stand next to her and be photographed at the same height — the single most important dimension in the build.
- 2–3 m for the wolf gives the animal presence without turning it into a monster that younger visitors find frightening. This is a deliberate ceiling, not a limitation.
- The gap between them should be wide enough for a family group to stand in, and is usually 3–6 m depending on the figure heights.
- Viewing from the side should also read, since a route passing the scene laterally is common. Check the composition from the walking direction, not only from the front.
Where the scene sits on a trail rather than at a fixed viewing point, the figures are usually rotated slightly off the walking line so that visitors see the scene at an angle first and square on second — which extends the moment of recognition.
Where This Scene Works
Fairy tale scenes suit story-themed park areas, children’s trails, botanical garden winter routes, family festival grounds and hotel or resort gardens. They work particularly well as a midpoint feature on a walking route, where a single narrative moment breaks up a sequence of decorative figures.
For venues building a story-themed area, related pieces include the ugly duckling display, the knight with pegasus figure and the flower fairy installation. Where the route needs a gateway rather than a scene, the fairy forest arch uses the same woodland language.
See the full festival lantern range, the festival lantern design concepts or themed lantern displays for events for larger programmes.
Frequently Asked Questions
Related Products and Designs
Narrative scenes and figures: the ugly duckling, the genie lantern figure and the knight with pegasus.
For photo-led locations: the lantern festival photo spot. For larger programmes: city lantern festival displays.
Send the route plan, viewing direction and the space available between the figures through the contact form, and we will return a layout with the composition already resolved.

You May Also Like
Related Products

Movie & IP Lanterns
Feitian Apsara Lantern — Custom Flying Celestial Maiden Festival Display
View Details →
Questions
Frequently Asked Questions
Interested in This Product?
Get a custom quote within 24 hours. Our team is ready to help.